
📡 Virtual Desktop
Remote Desktop to your PC from your Meta Quest
Virtual Desktop is a premium application that enables wireless streaming of your Windows PC desktop and PCVR games to a Meta Quest headset (Quest 2, 3, 3S, or Pro). It provides low-latency access to your PC environment in VR, including web browsing, productivity, media playback, and launching SteamVR or Oculus PC games from within the VR interface. The Quest app is a one-time purchase (approximately $19.99 USD from the Meta Quest Store), while the PC Streamer software is free.
This guide is designed for VR newcomers and assumes a compatible setup. The process requires both devices to be on the same local 5 GHz Wi-Fi network (or better) for optimal performance.
📋 Requirements
- Headset: Meta Quest 2, 3, 3S, or Pro (standalone mode).
- Meta account for Quest Store purchase
💻 PC:
- Windows 10 or 11 (64-bit).
- Intel Core i5-2500K or equivalent CPU.
- NVIDIA GTX 970 or better GPU (for PCVR gaming; integrated graphics may work for desktop streaming only).
- Latest GPU drivers installed.
⚙️ Network:
- 802.11ac (Wi-Fi 5) or 802.11ax (Wi-Fi 6) router.
- PC connected via Ethernet cable to the router (essential for stability).
- Quest connected exclusively to the 5 GHz band (create a dedicated 5 GHz SSID if possible; avoid 2.4 GHz or guest networks).
- No VPNs, firewalls blocking ports, or antivirus interference (e.g., add exceptions for Avast/McAfee).
- Same network for both devices.
🔢 Purchase and Install Virtual Desktop on Your Quest Headset
1. Put on your Quest headset and ensure it is connected to the internet via Wi-Fi.
2. Open the Quest Store (from your library or app drawer).
3. Search for “Virtual Desktop” (by VR Desktop, Inc.).
4. Purchase and download the app (approximately $19.99 USD; no subscription required).
5. Once installed, do not launch it yet.
🔢 Download and Install the Virtual Desktop Streamer on Your PC
1. On your Windows PC, open a web browser and visit the official website: https://www.vrdesktop.net/
2. Click Download Streamer App (direct link: https://files.vrdesktop.net/files/VirtualDesktop.Streamer.Setup.exe).
3. Run the downloaded VirtualDesktop.Streamer.Setup.exe file.
4. Follow the installer prompts (accept defaults; it will add firewall exceptions automatically).
5. Launch Virtual Desktop Streamer from the Start Menu or desktop shortcut. In the Streamer window:
- Enter your Meta username (the one associated with your Quest account that purchased the app; find it in the Meta Quest mobile app under Devices > Headset Settings).
- Click Save.
6. Under OpenXR Runtime, select VDXR (recommended for optimal performance). Ensure Video settings are appropriate (e.g., HEVC codec for supported GPUs).
7. Leave Allow remote connections disabled unless using over internet (requires port forwarding).
🔢 Network Preparation
1. Connect your PC to your router using an Ethernet cable.
2. On your Quest: Go to Settings > Wi-Fi.
3. Connect to your router’s 5 GHz network (e.g., “MyRouter-5G”; separate SSID from 2.4 GHz if available).
4. Verify both devices show the same network name in their respective interfaces.
5. Disable any VPNs or power-saving modes on your router/PC.
🚀 Launch and Connect
1. Ensure the Virtual Desktop Streamer is running on your PC (minimize if desired; it runs in the background).
2. Put on your Quest headset and launch the Virtual Desktop app from your library.
3. The app will scan for available PCs:
4. Select your PC from the list (it appears with your PC name).
5. Confirm the pairing prompt (one-time process; uses secure authentication).
6. Upon connection:
- Your PC desktop will appear as a large, resizable virtual screen in VR.
- Use Quest controllers to interact: Point and press the trigger to click, use the thumbstick/joystick for scrolling/panning.
7. Access the Virtual Desktop menu:
- Press the Meta/Oculus button (left controller) or hold the menu button (three lines) to open the side menu.
Options include: Adjust screen size/curvature, launch SteamVR/Oculus games (from Games tab), play media, or tweak streaming quality (e.g., bitrate up to 200 Mbps for high-end setups).
ℹ️ Additional Usage Notes
- PCVR Gaming: From the VR menu’s Games tab, select and launch SteamVR or Oculus titles directly (SteamVR installs automatically on first use). Prefer VDXR runtime for best compatibility.
Performance Optimization
| Setting | Recommendation |
| Bitrate | 100-150 Mbps (auto for beginners) |
| Codec | HEVC (NVIDIA/AMD) or AV1 (newer GPUs) |
| Framerate | Match your monitor (72-120 Hz) |
| Resolution | Headset max (e.g. 3072×3072 per eye on Quest 3) |
- Disconnect: Open the VR menu > Computers > Disconnect.
- Sharing: Multi-monitor support; stream specific displays via Streamer settings.
🛠️ Troubleshooting
- PC Not Detected: Restart Streamer/Quest, verify network (use ipconfig on PC and Quest Settings > About), disable firewall temporarily.
- Lag/Artifacts: Wire PC to router, reduce bitrate, update GPU drivers, close background apps.
- Black Screens (Streaming Services): Disable hardware acceleration in your browser settings.
- Errors: Install Windows Updates, disable HDR/Night Light on PC, check antivirus exceptions.
- For advanced issues, consult the official forum: https://forum.vrdesktop.net/
- This setup delivers a cable-free, immersive PC experience. It’s also noteworthy to mention that you can connect to your PC via Steam Link, USB-C cable (Link) or Wi-Fi (Air Link) by installing the Meta Horizon Link app on your computer. However, in most cases it’s recommended to use Virtual Desktop.
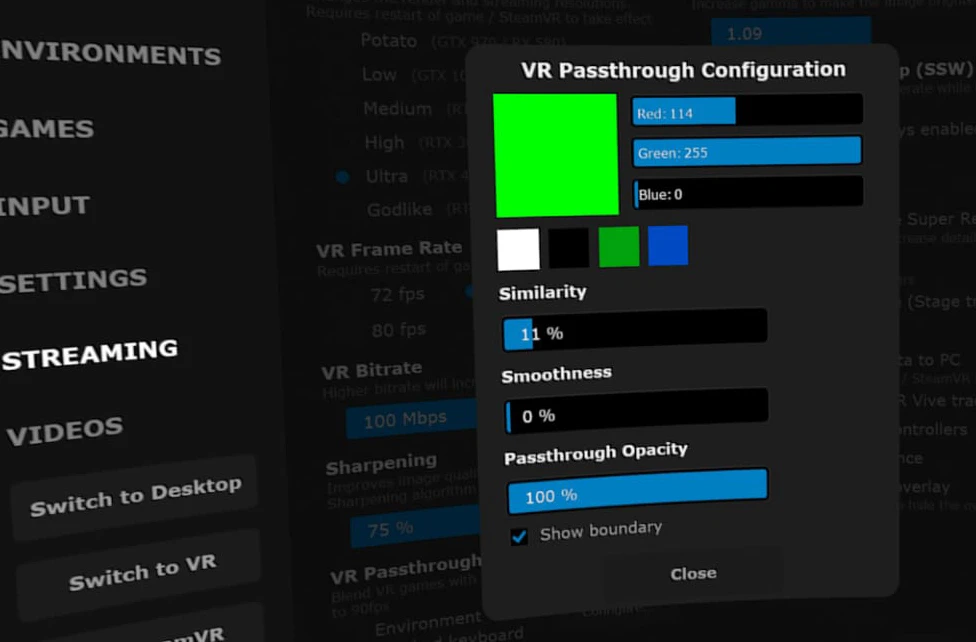
ℹ️ My Settings
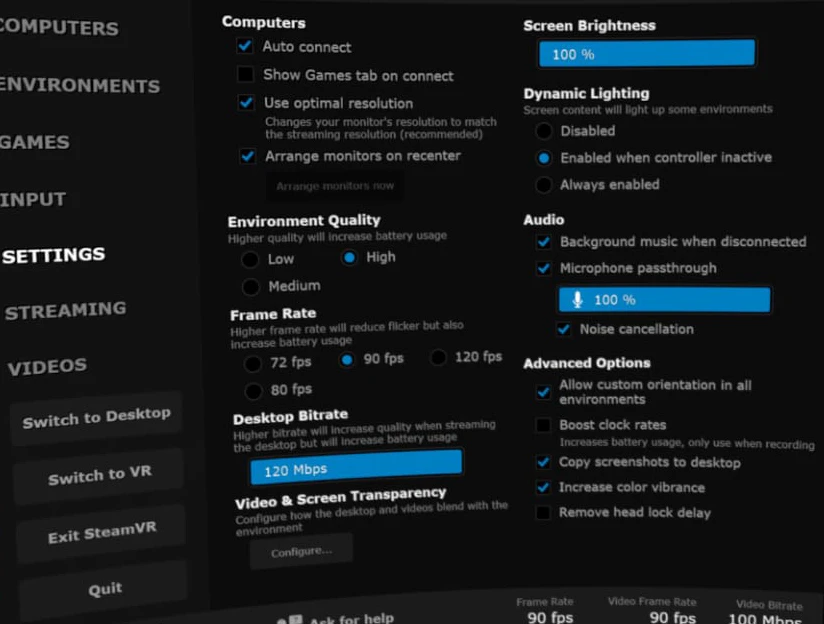
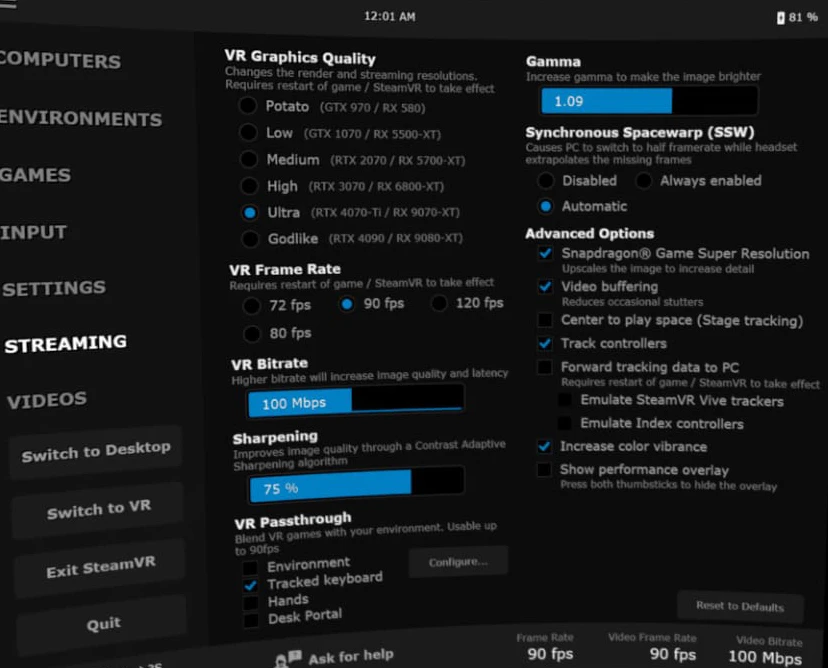
If you want to use the green paint in Bigscreen to utilize passthrough, check the image below for the values under 'Streaming'. Also check the environment checkbox under VR Passthrough.
Share this post